Wednesday, September 26, 2012

WIP: Growth Charts and Some Fabric Selecting

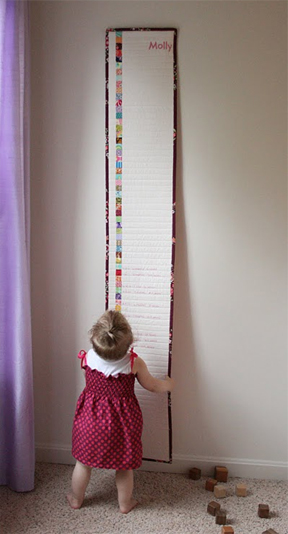
I finished quilting my growth charts!  I want the applique to stand out from the quilting, so I am going to add the letters and numbers last.  This is what I've got so far (times two):

Here are the backs.  I just pieced together some random leftover fabric.  Even though probably no one will ever see the backs.  :D

I quilted them with straight lines one inch apart.  I still don't have a walking foot, so I've resigned to always having wrinkles and pulls from using my regular foot to do straight line quilting.  I tell myself that it looks cool and that I did it that way on purpose - I was vigilant about making sure I changed directions with each line.  Does anyone know where to find a walking foot that fits a Bernina Activa that isn't FREAKING EXPENSIVE?!?!

We've been watching a lot of football lately, so I decided to sew the binding on by hand during games.  I've got the first one finished, now onto the second one!

I have all the applique pieces fused and cut.  The numbers will run along the skinny side, marking each foot.
And the names will run along the fat side.  I haven't decided yet if I am going to do something about the holes that are supposed to be in the Os and As and such.


ALSO.  It's almost time to get started on the stocking advent calendar I am planning to make.  I got out the fabric today and sorted it, just for fun:

I also pulled out this fabric.  I want to make some kind of skirt out of it, but I don't really know how to go about it.  Any suggestions?

I decided to go with this design for my Storm at Sea quilt.  Except some of the white spaces will be more grayish, cuz I don't have enough white.  And I'm going to add orange. :)   I'm SUPER excited to get going on this one!


And there you have it!  I actually have more than one work in progress today - even though I generally tend to only work on one project at a time.

Linking up!

WIP Wednesday at Freshly Pieced

Friday, September 14, 2012

Look who did some applique!

Applique has always made me a bit nervous.  I've tried it a couple of times (see HERE and HERE), but haven't been fully impressed with the results.
But then I got myself some fusible interfacing (I think that's what it is...) and realized that was the one rule of applique that I should NOT have broken.  My latest project turned out much better than my previous ones!


See, the Hubby and I are both BYU alumni and avid BYU football (and soccer, and basketball, and volleyball) fans.  I've been keeping my eyes peeled for some cute BYU attire for my boys, but to be honest - everything I have found is so. freaking. expensive.
So I took the plunge and decided to make my own (3 onesies for 6 dollars?  Okay).  I must admit, I was pretty nervous about sewing onto knit fabric, since I've never done that before, but I used that interfacing and everything came out great!


I printed my design (copied from Google Images) on freezer paper and then fused the interfacing to the blue part.  I sewed the background down using a zigzag stitch, partly because I wanted it good and stuck, and partly because I didn't want to worry about cutting seam allowance in my interfacing.  For the Y, I just used a regular straight stitch (slightly shorter than normal).  I'm hoping the edges get a tiny bit ruffly in the wash.  I was impressed with how easy this project was!  I'll have to make another set when they get bigger...

The boys are going to wear them tomorrow for our big game against Utah.  Go Cougars!!!

Wednesday, September 12, 2012

WIP: Growth Chart and Storm at Sea Quilt

I've been working on making a quilted growth chart for my boys.  Inspired by this one:
SOURCE:  The Student/Teacher via thelongthread.com
I spent some time digging through my scraps, sorting, cutting, and sewing them together very carefully in an effort to make sure the finished blocks measure exactly 1 inch tall.  They are VERY close, but they won't be exact.


It's not finished yet because I got a little distracted by an idea...

I want to make a quilt for someone in my life who doesn't seem quite so into the modern quilts that I love.  I'm guessing she would like something more traditional - like what my Grandmothers used to make.  I was having a VERY hard time thinking of something that would work, but still fit my style enough for me to be motivated to make it.  Until I found this:
I CANNOT find the original source for this photo!  I found it on Pinterest.  I think this version of the pattern is by Larisa Key - called "Impulse", from an old issue of Quilter's World magazine.
It's the Storm at Sea pattern.  I have seen some more traditional versions of this quilt, but wasn't really drawn to them.  THIS one, though, I LOVE.  It's traditional, yet there are so many different ways to make it look modern.
I'm thinking of using this fabric, which is part of a giveaway from Red Pepper Quilts that I was VERY, VERY lucky to win...
Although I am tempted to throw in the orange and brown...
I printed out a coloring page and set to work trying to decide exactly how I wanted my design to work.  Of course, the colors aren't true to form (I don't have THAT many markers), but you get the general idea.  This is what I came up with:

The three designs are essentially the same, with the difference being the way the white parts are distributed.  But I am having such a hard time deciding which one I like best!  Will you help me?  I want the ribbons to be the main focus, but I also want the circles and the stars to come through in the design as well.  What do you think?
Should I go with

A:

B:

Or C:

Thanks for stopping by!
Linking up:
WIP Wednesday at Freshly Pieced
p.s. If you are just visiting, you could check out the sewing machine cover I finished last week.  I posted my progress a few weeks ago, but never linked up the finished deal.

Wednesday, September 5, 2012

Sewing Machine Cover

I finished my sewing machine cover!
Here is the finished back:

I used Melissa's Tutorial to make my flying geese. 
Her tutorial was excellent.  My measuring skills?  Not so much.  Above are my geese before being sewn together.  They look great, eh?  Of course, once I sewed them together I lost all my points.  I realized this was going to happen before I attached them all, but after making 12 geese.  I decided to just let it go.  If I were making this for someone else, I would have picked them all and started over.  But I didn't want to do that, so I left them. :)  You can't really tell if you squint hard enough.

For the quilting, I kept it minimal and just echoed the design from the front, only quilting in the neutral spaces.  It took me like 10 minutes.

I stuck some purple ribbon into the binding for ties.

And here is the back.  Although it doesn't really feel like a "back."  It's just the other side of a reversible quilt.

The quilting looks cool on this side, though.

I bound it in a teal batik and decided on a whim that I wanted to hand stitch the binding.  I am getting better all the time and starting to see why people enjoy it so much!  I might do this more often, time permitting...

And here is my sewing machine all decked out!   

I hardly ever take the extension table off, so I made it a little longer to account for that.


I love it!


Friday, August 24, 2012

The Liebster Blog Award

Hi Friends!

Way back in March, I received the Liebster Blog Award from Jill at Cre8fMomQuilts (she is a mom to twins - a boy and a girl in college)!  How cool, huh?  At the time I was getting ready to go back to work with two little babies and I guess I got a busy and forgot all about it.  Well, I remembered last night and I think it is past time for me to pay it forward, don't you think?

Here are the rules:
  1. Thank the person who gave you the award (THANKS JILL!).
  2. Link back to their blog.
  3. Copy and paste the Liebster award to your profile.
  4. Pick 5 blogs that you feel deserve to be in the spotlight (they must have under 200 followers).
  5. Blog about it and leave a comment for your nominations to let them know that you have chosen their blog. 

Here 5 blogs that I love and have chosen to highlight (hopefully none of them have already received the award):

First up is A Maiden Hair Fern.  I just found her blog recently - she has a super awesome raggy binding tutorial that I can't wait to try!  Plus, she is pretty much redoing her whole house using Reunion Fabrics and it looks amazing! 

Bethany at Make Me a Quilt is a relatively new blogger, but she is so much fun to follow!  She has great style and is a great blogger.

I found Melissa at Classy Quilts through a linky party when she mentioned that she had passed the PE.  My husband is a civil engineer and he had just taken the PE (Professional Engineer) exam as well (HE PASSED!!!  It is a very hard/strenuous test).  That was exciting.  Plus, Melissa makes a lot of really cool stuff and she has a great eye for fabric.

Becky at {My Domestic Design} is a wonderful, long time friend.  She and I went to high school together, but now she lives far away and I have to keep up with her through her blogs.  She has an adorable little girl and she is always making adorable things for her, amongst other stuff.  Last I checked, she was taking a blog break (for summer), but maybe she will be back soon!  Hi Becky! :)

And lastly, I found Colby of Sew.Quilt.Explore through the Let's Get Acquainted Blog Hop, and decided I really liked her style, so I became a follower.  Go check her out and the cute things she is making!

Wednesday, August 22, 2012

WIP: Sewing Machine Cover

I've been working with HSTs!  It's kind of a new thing for me.  I kind of like it.
I even tried something new - pressing to the side. :)  I've always been a big fan of pressing all my seams open, but since I had a lot of neutral fabrics and such, I tried the whole "pressing to the side" method. 
My seams weren't as flat as usual, but I think I like the way it works with HSTs.  It was also kind of nice having my seams butt together when I sewed the squares together.  I think next time I will press my rows open, though.  Good times.
I've been wanting to make one of these diamond designs forever.  At first, I wasn't a big fan of anything made with HSTs, but then I saw THIS and THIS and changed my mind.  I used a bunch of scraps and some fabric the Hubby picked out for me for Christmas.
It's going to become my new sewing machine cover.  If I don't decide to just hang it on the wall...  Which I probably won't since our walls are pretty much already full.

I'm going to make the sewing machine cover reversible, since I wanted to try two different designs.  Why not?  This is going to be part of the other side:
I like working on small projects!  I've got a few more small projects in mind before I tackle my next big quilt.  This is fun!

WIP Wednesday at Freshly Pieced


Wednesday, August 15, 2012

A Rummy Royal Mat


Have you ever played Rummy Royal?  It's a poker/rummy game played with cards, a mat, and poker chips (we like to use pennies reserved specifically for this game). 

Every year my husband's family goes to their cabin in Island Park (Idaho), which is stocked with a bunch of old games.  I think the cabin Rummy Royal game dates back to our grandparents' time.  :)  Either way, we love it and we play it every year (probably because we don't have a game mat of our own back home).  This is what the mat looks like.

This year I joked that I really needed to make us a Rummy Royal mat so we could play more than once a year.  My in-laws joked that they used to have a homemade mat - made from a pizza box!  But the hubby followed up on the idea and suggested that I should seriously make one.  So I did!  It seems like a silly thing to make in quilt form, but I can't wait to play now!

I designed everything myself - apparently there are absolutely no online tutorials for something like this.  Weird.  Although I did use the method explained in the book We Love Color for making the octagon shape (which is genius, by the way).
I quilted the whole thing with closely spaced straight lines and used flannel instead of batting for the inside so that it would lie thinner and flatter.  I appliqued the hearts and letters, which was fun since I've pretty much never done applique. 

For the back I used this print that I bought a long time ago but have never been able to actually use because it doesn't match ANYTHING.  I think it looks a little like cards, don't you?

I tried something a little crazy for the binding.  I decided I wanted each edge of the octagon to be a different color (matching the center) rather than all one color or just random scrappy, so I did some measuring and I think I got it close enough.  I used single fold binding again and sewed it down by hand this time so that it would be less bulky.

Now all I need to do is get someone to play with me!

Working on a quick project was a lot of fun.  However, I have a hard time staying in limbo (it's like finishing a book without having another one lined up to read next) - so my next project is already underway:

ETA:  I've created a listing for Rummy Royal mats on Etsy!  You can get your own mat HERE.
Also, I've been following the "Let's Get Acquainted" Blog Hop for awhile and have decided it's time to link up.  If you're visiting, WELCOME!  Have a look around - I've been busy lately!


Plum and June